
How to Make an Antler Ring: Step by Step (With Just a Drill)

Updated: Nov 10
Affiliate disclosure: Some links in this post may be affiliate links. If you buy through them, I earn a small commission at no extra cost to you — it helps keep the studio running and the tutorials free. I only link to supplies I actually use in my own shop.
By Hunter Richardson, Hunter Wyatt Studio, Strasburg, Virginia — skull cleaning and carving for 10+ years.
Quick answer: To make an antler ring, cut a slice of antler a little wider than the finished ring (10mm is typical for a man's ring, 8mm for a woman's), flatten both sides on 220-grit sandpaper, and drill out the center with a bit as close to your ring size as you can. Sand the inside up to size, then sand the outside on a mandrel from 220-grit up to 800-grit. Seal it with thin CA glue (or beeswax for a natural finish), polish, and wear it. No lathe needed — every ring in my book was made on a drill.

An antler ring is one of the oldest pieces of jewelry known to mankind — and you can make one with a drill you probably already own. Using a drill as a lathe is how I got into making antler rings, and every ring in my book, The Antler Ring Guide, was made on a drill lathe. A lathe is the more professional setup and gives more precise results, but better tools don't always make better products — and there's something special about the handmade look. This post walks the full drill process, start to finish.
Materials: You don't need much — an antler, a saw, a drill, a mandrel, sandpaper, and CA glue or beeswax, plus a respirator and gloves. The full list of materials I use, with links, is at the end of this post.
First, the Antler
Antler is bone — a hardened, solid outer layer over a porous (cancellous) core. Whitetail and mule deer, elk, moose, and caribou all grow them, shed them every year (roughly January through April), and grow a new set. A few ways to get your hands on one:
Shed hunting — walk and find the ones deer dropped. Great excuse to be in the woods.
A pet store antler chew — the quick way to start. Pieces run about $20 and will make at least 6–10 rings.
Etsy — sellers offer rough-cut antler ring blanks and slices.
Antler groups on Facebook — post that you're looking for plain, not-so-fancy antlers to cut up.
One caution: fresh (green) antlers need to dry 6–12 months in a dry, well-ventilated area before you work them.
The Setup: A Drill, a Mandrel, and Sandpaper
The mandrel is the part that holds the ring while you sand and polish. I started with a homemade one and still use it today: take a ½-inch wood rod, cut a 6″ section, chuck it in the drill, and wrap painter's tape around it while it turns slowly, building it up until the ring slides on snugly. Make the side closest to the drill slightly thicker and you get a cone shape that helps hold the ring. (Don't use electrical tape — it leaves black gunk on the ring.) Machined and 3D-printed mandrels exist too; you get what you pay for, but they all work.

Sandpaper does double duty — shaping and polishing — in a range of 220- to 800-grit. And you'll want thin CA glue (super glue): the thin kind soaks into the antler for stabilizing, sealing, and inlays. Gel CA just dries on the surface — save it for securing ring cores.

Step 1 — Cut Out a Slice of Antler
Choose where on the antler you'll cut, based on the ring you're making. A metal hand saw or a scroll saw both work — antler is hard, so take your time. Cut the slice a little wider than the finished width to allow for sanding the sides down: the cut leaves linear marks that have to come off. Typical finished widths are 10mm for a man's ring and 8mm for a woman's.

Then flatten both sides: on a flat piece of 220-grit sandpaper (a belt sander works great for this too), sand until smooth. Get at least one side nice and flat before you drill — a flat side keeps you from drilling a slanted hole.

Step 2 — Drill Out the Inside of the Ring
Use a bit size as close to the ring size you're making as you can — it saves a lot of interior sanding later. Hold the slice with a pair of pliers, clamping only as much as needed to keep it from spinning. Setting the slice on a piece of wood and drilling down through it into the wood helps stability and gives a cleaner cut. Handheld drill or drill press, either works.
If the antler starts heating up from friction, stop and let it cool — antler held hot for a long time can get more brittle.


Step 3 — Rough-Cut the Outside
Depending on your cut and the size of the slice, take the extra material off the outside now — it saves sanding time later. A belt sander is great for this, sandpaper on a flat surface works, and if the ring isn't completely circular, a bandsaw can cut it to shape.

Step 4 — Sand the Inside of the Ring
Get the inside as close to final size before sanding the outside. The inside sands easily because the drill left it a perfect circle. Work by hand with sandpaper wrapped around your finger, or with a sanding drum — a Dremel with a small sanding drum, moved in a circular motion, gets you close to size fast; then finish by hand with a higher grit.

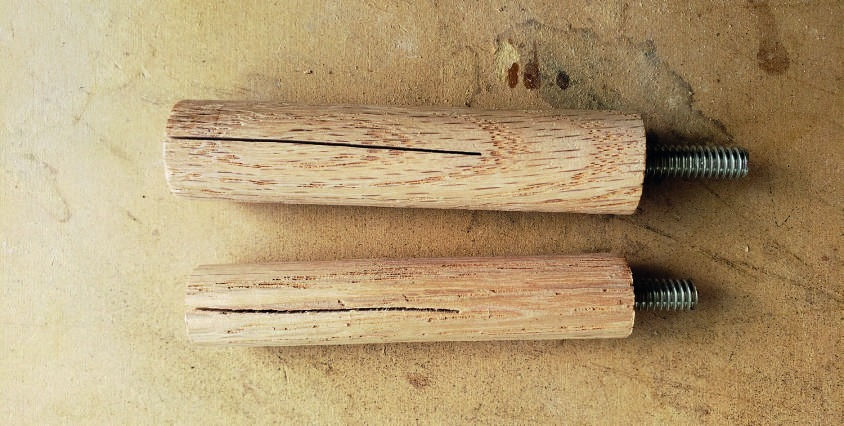
My favorite trick from the book: make your own sanding drums from a wood dowel. Cut a 4″ dowel, drill a small hole in one end, screw a bolt in about ½–¾″, and cut the bolt head off so your drill chuck can grab it. Saw a line about 3″ down through the center (like a clothespin), slip sandpaper into the slot, slide the ring over it, and sand. Different dowel sizes fit different rings — I use these a lot, especially with ring cores.
Step 5 — Sand the Outside of the Ring
On the drill and mandrel, start at 220-grit and sand the outside smooth, working progressively up to 800-grit for a smooth, shiny finish. You can go further — up to 3000-grit for extra shine — but 800 works just fine.
To get the ring balanced and close to a perfect circle: lightly touch a pencil to the ring while it's spinning on the drill. The pencil hits the high spots and leaves a mark — sand just that area, and repeat until you get a solid line all the way around.

Step 6 — Seal
Sealing does more than make the ring look nice. It protects the ring from moisture — sweat from your hand and any water it meets — fills in micro pits, scratches, and holes for an even surface, adds shine, and strengthens the surface. Two options:
CA glue — the better option. It soaks into the ring and is a permanent protector, and a worn CA finish can be re-polished later. With the ring slowly spinning on the mandrel, apply a thin coat until the whole ring looks wet — just don't glue the ring to the mandrel. It dries fast. Once dry, sand again, this time starting higher, around 360-grit, and work up. Don't forget to seal the inside too.
Beeswax — the more natural finish, but it needs re-polishing on a regular basis. (For antler pieces worn on the body, like necklace or beard beads, beeswax is the one I recommend). Warm the ring first — in your pocket, or in the sunshine — so the wax penetrates better.
If you're going the beeswax route, skip ahead: once you've sanded to 800-grit, finish with the polish step.
Step 7 — Polish
Polishing protects the ring further. After sealing, put beeswax or a finishing wax on a cloth and apply it while the ring is spinning. Leather with wax works great for a nice polish too.

Step 8 — Enjoy
You have now made one of the oldest pieces of jewelry known to mankind.

A Note on Safety
Two areas need real care:
The drill. Keep fingers, hair, and clothing from getting caught. Roll up your sleeves, tie up your hair, and hold your sandpaper on one side of the ring — never wrapped around it. Sandpaper can catch on the mandrel and pull your fingers with it. The drill typically spins clockwise, so holding the paper toward the bottom works best.
The dust. Breathing bone dust over an extended period can scar your lungs. Work in a well-ventilated area, use fans to blow dust away, run a vacuum while you work — and wear a respirator. Eye and ear protection are always best, and I wear latex gloves: they keep your hands and the ring clean (antler dust plus skin oil makes a sticky film on your fingers), and gloves are a genuinely good idea around CA glue — I've had to cut two rings off my own fingers with a razor blade before I learned that lesson.
Sizing, Quickly
To find a ring size, wrap paper or string snugly around the largest part of the finger, mark the overlap, and measure it (a fabric tape measure works too). Measure the correct hand — your two hands differ slightly. Big knuckles? Size the base of the finger, then the knuckle, and pick a size in between. A wider band fits tighter, since it contacts more skin. Measure toward the end of the day, at room temperature, when fingers are largest. Typical sizes: women 6–7, men 9–10 (size 9 = 19mm inside diameter, size 7 = 17.3mm).
Shape matters too: rings left to chance come out D-shaped in cross-section; a court shape — domed on the inside — is the most comfortable and slides over the knuckle easiest.
Making Antler Rings — FAQ
Do I need a lathe to make antler rings?
No. A lathe is more stable and more precise, and it's the route to consider if you want to make rings as a career — but every ring in my book was made on a drill used as a lathe, and a drill gives you a bit more flexibility. You'll need a mandrel to hold the ring either way.
How wide should an antler ring be?
It's preference, but the typical finished width is 10mm for a man's ring and 8mm for a woman's. Cut your slice a little wider than that and sand the sides down to final width.
Where do I get antlers for rings?
Shed hunting, a pet store antler chew (about $20 will make 6–10 rings), rough-cut ring blanks on Etsy, or post in an antler group on Facebook asking for plain antlers to cut up. Fresh antlers need to dry 6–12 months before use.
Is an antler ring strong enough to wear every day?
Yes, with reasonable care. Antler is a very strong material — most ancient digging tools found at archaeological sites are antler. Rings made from the solid outer part are the strongest; sections that include the spongy core are weaker, even stabilized with CA glue. I wore one for about a year, doing everything, and it held up fine. But it isn't metal — enough force can break it.
CA glue or beeswax to seal — which is better?
CA glue, for a ring. It soaks in, permanently protects against moisture, and can be re-polished if it wears. Beeswax is the more natural finish but needs regular re-polishing — I recommend it for antler jewelry worn on the body, like beads and pendants, instead.
What grit sandpaper do I need?
220 through 800 covers shaping and a smooth, shiny finish. Go up to 3000-grit if you want extra shine. After sealing with CA glue, sand again starting around 360-grit and work back up.
How do I know my ring size?
Wrap paper or string around the largest part of the finger, mark the overlap, measure it, and convert (size 7 = 17.3mm, size 9 = 19mm inside diameter). Measure at the end of the day, when fingers are largest — and measure the hand the ring will actually be worn on.
Can I do more with an antler ring than a plain band?
A lot more. Metal or stone inlays, ring cores for strength and comfort, carved and signet shapes, scrimshaw, and pyrography all build on this same basic ring — those are full chapters in the book.
Materials — The Full List, With Links
Tools:
Drill (handheld or drill press) — or a lathe, if you go that route
Mandrel — homemade (½″ wood rod + painter's tape), 3D-printed, or machined ring mandrel
Saw — metal hand saw or scroll saw (a bandsaw helps for shaping)
Drill bit — as close to your target ring size as you can get
Pliers — to hold the slice while drilling
Belt sander (optional, great for flattening and rough shaping)
Dremel with a small sanding drum (optional, for the inside)
Sandpaper — 220- through 800-grit (up to 3000-grit for extra shine)
Products:
Thin CA glue (super glue) — for stabilizing and sealing; gel CA for ring cores
Beeswax or finishing wax — for the natural seal and final polish
Wood hardener (optional stabilizer — darkens the antler slightly)
Safety:
Respirator — 3M half-face respirator kit with P100 filters — non-negotiable, antler dust is bad for your lungs
Gloves — latex, especially around CA glue
Eye and ear protection
The respirator link is an Amazon affiliate link. Everything else is listed by name only — use what you already have in the shop where you can.
Want to Go Further?
The full book: The Antler Ring Guide on Amazon — this post is the basic ring. The book adds ring cores, inlay, sizing charts, scrimshaw and pyrography (guest instruction), other techniques, and an inspiration gallery.
Prefer digital? The Antler Ring Guide (Digital PDF) in my shop — same book, instant download.
Free starter guide: The free Antler Ring Guide — the getting-started version, free.
My YouTube channel: Hunter Wyatt Studio on YouTube — antler rings, skull cleaning, staining, metal finishes, and carving, in video.
The burrs behind my carving work: The Carving Burrs I Use for Skull Carving
Thanks for learning with me. Now go make a ring!
— Hunter Richardson, Hunter Wyatt Studio, Strasburg, Virginia


Comments