
The Carving Burrs I Use for Skull Carving: The Must-Haves and What Each One Does
If you want to start carving skulls, you do not need a drawer full of burrs. Most of my carvings are done with just a few: a Dremel 106 ball burr for outlining, an inverted cone burr (like the Dremel 108) for clean lines and edges, and carbide cross-cut burrs for carving down layers around a design. Everything else on this list — cup burrs, diamond discs, ball burrs for stippling, cylinder and flame burrs, diamond burrs, and used dentist burrs — fills a specific job. Here is every burr I actually use, what each one does, and where to get them.
New to skulls entirely? Start with How to Clean a Deer Skull — carving starts with a clean, degreased, whitened skull.
The three types of carving burrs
There are three main types of burrs: carbide, diamond, and dentist style burrs. Dentist style burrs are just smaller carbide/diamond burrs, but they deserve their own category.

Carbide burrs cut with spiral flutes — actual cutting edges that chip the bone away. Double-cut (cross-cut) flutes cut more aggressively and leave a smoother finish than single cut.
Diamond burrs are diamond dust affixed to a steel head. They remove material by grinding, so they are great for finishing, contouring, and smoothing — but they make much smaller, lighter bone dust that stays suspended in the air longer. Wear your respirator.
Dentist style burrs are 1/16" shank burrs made for high-speed carvers, in both diamond and carbide. I use them regularly in my Dremel with an adjustable chuck.
Common shank sizes are 1/8", 3/32", and 1/16". Be careful when ordering that you are not getting 1/4" shank burrs — most rotary tools can't use them. I run my burrs in an adjustable chuck instead of collets: collets can fit poorly and wobble, the chuck's three teeth hold any of those shank sizes with no wobble. Position the burr so it sticks out about 1/2 inch — any further and it can wobble, tire your hand, and even bend at speed.
Carbide burrs
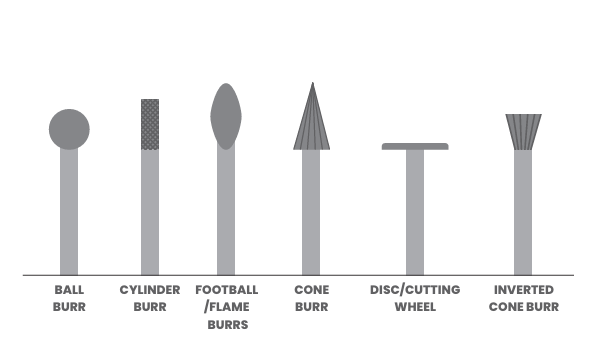
Carbide burrs cut with spiral flutes — actual cutting edges that chip the bone away, instead of grinding like diamond. Double-cut (cross-cut) flutes cut more aggressively and leave a smoother finish than single cut. Most of the burrs below are carbide: the ball burrs, the inverted cones, and the cross-cuts.

⭐ MUST-HAVE #1: Dremel 106 — the workhorse

The Dremel 106 is my workhorse. It's about a 2mm ball carbide burr, and it's what I outline my designs with. I once carved a whole skull using only a 106 just to prove to myself it could be done. It's not the fastest for every job, but it will do almost any job — if you could only own one burr, this is the one.
Buy it:
⭐ MUST-HAVE #2: Inverted cone burrs (Dremel 108) — my personal favorite
This is my personal favorite burr to use. When it comes to clean, straight lines and edges, this will be your go-to burr. A smaller inverted cone burr cuts all the straight lines when carving letters, and you can use it for any line in a carving — the outline of a design or the details inside it. Checkering, feathers, fur, and small fine details can all be done with the inverted cone burr.
The Dremel 108 is the small inverted cone I reach for most. After outlining with the 106, I switch to the 108 to clean up and define the outlines — hold it vertical to the surface and it cleans up edges nicely, and it's great for adding texture too. I carved a whole eagle feather with just a 108.
Buy it:
⭐ MUST-HAVE #3: Carbide cross-cut burrs — for layering

When I need to carve down the area around a design to create layers, I use carbide cross-cut burrs. They go by a lot of different names, they're pretty cheap, and you can get a ton of work out of them. If you do any carving — bone or otherwise — I highly recommend these. A flame-shaped cross-cut is another favorite of mine, and a large cross-cut ball burr is what I use to bevel scroll work. Cross-cut cylinder burrs are also some of the best burrs for cut-through designs.
If your carbide burrs get gummed up with debris, clean them with a small wire brush, brushing in the direction of the cutting edges (more on cleaning below).
Buy it:
Cylinder burrs — cut-throughs, edges, and outlines
Cylinder burrs — both carbide and diamond — have a wider range of uses than almost anything else. Held vertically to the surface, a cylinder burr plunges all the way through the bone for cut-through designs. A carbide cylinder also carves the edges of a design, and removes more area than an inverted cone, which saves time when you're adding depth and layering. Smaller cylinder burrs are great for outlining a design and for general straight and curved lines, and the small tapered "needle" type cylinders make the fine cuts used in cursive letters.
Ball burrs — stippling, dots, and curved lines
Ball burrs come in handy often: carving dots and holes, stippling, curved letters like O, P, and S, outlines and any curved lines in a design, and roughing out shapes in relief carvings.

For stippling specifically — a technique I see done wrong all the time:
Use the correct size burr. A larger area can take a larger ball burr; smaller areas want a smaller one. Carbide burrs work better than diamond for stippling.
Stipple all the edges on the inside of your design first, so the edges are correctly stippled — you'll blend them in later.
Overlap your divots. Plunge the burr in a random fashion, making sure the cuts overlap. Divots side by side don't give you that random stippled look.
Fill in all the areas between your edges, blending in the edges you stippled at the beginning.
(The Dremel 106 above is a ball burr; larger ball sizes are in most carbide sets.)
Football / flame burrs — shaping relief
There are a few different names you'll see this burr called, but the football shape describes it best. This burr is used primarily for shaping relief designs, and for general smoothing and cleanup of the bone around and inside a design. I also use a football-shaped diamond burr to add natural shapes to flowers and similar details, and a diamond disc or football burr to slope and smooth the inside edges of a design.
(Flame/football shapes are included in the cross-cut set on Amazon.)
Cup burrs — perfect circles

Cup burrs (or even hole saws) are a great way to carve perfect circles for skull carving. They also work on wood. They come in a variety of sizes and shapes — I made a full video reviewing each one and how well (or badly) they worked.
Diamond discs and cutting wheels — undercutting and cut-throughs

Those there are small diamond discs (also called cutting wheels), and they work great for undercutting the edges of a design to make it appear as if it is floating above the surface of the skull (or any other material).
From the book: cutting wheels are great for carving cut-through designs, and good to have around for random bone cutting. Diamond dust discs are different — they're not used for cutting, but held vertically to the surface so the flat side of the disc rotates across the bone to smooth it out. They're great for leveling and smoothing the negative space behind a design.
Diamond burrs — finishing and smoothing
Diamond burrs come in different grits, similar to sandpaper, and work well for finishing, contouring, and general smoothing out areas of bone. Like sanding, you can start with a lower grit burr and work up to a higher grit. I carved a cat skull with a cut-through design using diamond burrs and a Dremel.

One thing to know: because diamond burrs grind instead of cut, they produce smaller bone dust particles that hang in the air longer, while carbide burrs make larger particles that settle out faster. I compared the two under a microscope — the difference is definite. Another reason that respirator matters.
Dentist burrs — the free ones


One tip most people never think of: ask your dentist for their used burrs. You may have to ask around, but plenty of dentists will give them away — as long as they've been sterilized in the autoclave. I've gotten hundreds of free burrs by simply stopping into a dentist and telling them I use the burrs for carving. The diamond dust ones are especially good for carving skulls, and I use dentist burrs all the time, even with my Dremel 4000 and adjustable chuck. Free is hard to beat.
DualSpur circle bits — good for circles, not spheres

In my quest to find a burr to carve spheres, I found the DualSpur Circle Carving Drill Bits from Cool Izzy. My findings: they work good for carving circles in bone, but if you plunge the burr down to create the sphere, it starts to chip the bone — so I keep them for carving circles. They actually carve surprisingly well in wood, cutting near-perfect spheres quickly.
Buy them: DualSpur Circle Carving Drill Bits
One burr I do NOT recommend for bone
You will see carbide point burrs that a lot of woodworkers use for roughing shapes into wood. I would not recommend these for bone — they are much too aggressive and may tear up the skull you're working on. They look cool, but take it from me, they are not a good idea for bone.
How to clean your burrs
Taking time to clean burrs that get gummed up with bone residue, dust, and soot will greatly extend their life and save you money.
Carbide burrs: clean with a wire brush. You may see people say you need a brass brush, but a wire one works fine as long as you brush lightly, in all directions over the head of the burr. If stubborn residue is still clogging the flutes, go over the burr momentarily with a torch to burn up and loosen the material, then wire brush again.
Diamond burrs: use a dressing stone / cleaning stone. Run the carver at its highest speed and plunge the burr into the stone several times. Don't overdo it — the stone is abrasive and will wear the burr down just like any other material.
And don't apply too much pressure while carving. Let the burr do the work — forcing it wears the burr out quickly.
Where I buy my burrs
You can find a small sample of burrs at your local hardware store, but it's more economical to purchase online, where the variety is much larger. I personally purchase most of my burrs from Amazon, Profitable Hobbies, eBay, BursUSA, and Esslinger.
FAQ
What is the best burr for outlining a design on a skull?
The Dremel 106 — a roughly 2mm ball carbide burr. It's my workhorse, and I've carved an entire skull using only that one burr.
If I can only buy three burrs to start skull carving, which three?
A Dremel 106 for outlining, an inverted cone burr (Dremel 108) for clean lines, edges, and texture, and a set of carbide cross-cut burrs for carving down layers around your design. Those three cover most of my carvings.
What is an inverted cone burr used for in skull carving?
Clean, straight lines and edges. A small inverted cone cuts the straight lines in carved letters, outlines designs, and does detail work like checkering, feathers, and fur. Held vertical to the surface, it also cleans up edges. It's my personal favorite burr.
What burr do you use for stippling?
Ball burrs — carbide works better than diamond for stippling. Match the burr size to the area, stipple the inside edges of the design first, and overlap your divots randomly instead of placing them side by side.
How do you undercut a design when carving a skull?
With small diamond discs (cutting wheels). Undercutting the edges of a design makes it look like it's floating above the surface of the skull.
Can you use dentist burrs for bone carving?
Yes. Dentist burrs are 1/16" shank diamond or carbide burrs made for high-speed carvers, and they also work in a Dremel with an adjustable chuck. Many dentists will give you their used burrs free if they've been sterilized in the autoclave — I've gotten hundreds that way.
What size shank burrs fit a Dremel?
1/8", 3/32", and 1/16" shanks all work in a Dremel with an adjustable chuck. Avoid 1/4" shank burrs — most rotary tools can't use them.
How do you clean a gummed-up carbide burr?
Brush it with a small wire brush in the direction of the cutting edges. For stubborn residue, pass the burr momentarily over a torch flame to loosen the material, then brush again. Clean diamond burrs by plunging them into a dressing stone at full speed.
Are diamond or carbide burrs better for skull carving?
They do different jobs. Carbide burrs cut with flutes and do most of the carving — outlining, layering, stippling. Diamond burrs grind, so they're better for finishing, contouring, and smoothing. Diamond burrs also make finer dust that stays airborne longer, so a respirator matters even more with them.
Want the complete system? All of this — burrs, tools, design transfer, carving methods with case studies, bone dust safety, and staining — is in my book: Skull Carving on Amazon
Disclosure: some links on this page are affiliate links. If you buy through them, I may earn a small commission at no extra cost to you.


Comments